Overview
This article will cover how to Create, and Modify resources. If a location does not have any spaces on a floor it will not show up for booking, and will not show up in other drop downs.
Getting to the Resources
Personal Space Resources
Navigating to Meeting Space Resource
- After Selecting Personal Spaces
- Choose Location
- Choose "Group"
- Choose "Floor"
- To Create a new Resource Click "Add Resources" Will Create a new Resource
- To edit an existing personal space, locate the space in the list or type the space name in the search box.
- Click the Edit icon
- Click the Bin icon to permanently remove a personal space

Creating New Resources:
Following the information above and then clicking "Add Resource" you will be greeted with a new screen similar to this:

- A: Name of Space
- B: Workspace Type
- C: Booking Type
- Bookable - Enables the space for Booking
- Flexi - Allows assignment of user to space, which if they do not check in will release the space for booking.
- Will show as in use in reporting
- Fixed - Assigned to an individual.
- Will show as in use in reporting
- Blank
- D: Floor number
- (This will not be visible if you choose a floor previously or use the Save and Add Another Button)
- E: Amenity list
- Available Amenities available at the resource.
- F: Click Save or Save and add another when done.
Meeting Space Resources
Navigating to Meeting Space Resource
- Select Meeting Space
- Choose Location
- Choose "Group"
- To Create a new Resource Click "Add Resources" Will Create a new Resource
- To edit an existing meeting space, locate the space in the list or type the space name in the search box.
- Click the Edit icon
- Click the Bin icon to permanently remove a personal space

Creating New Resources:
Creating new Meeting Spaces has a lot of options, though we will only be using a few. I've broken the page into a few parts for easy reading.

- A: Name of Meeting Space
- B: Workspace Type
- C: Group
- D: Location
- (This will not be visible if you choose a location previously or use the Save and Add Another Button)
- E: Floor
- (This will not be visible if you choose a floor previously or use the Save and Add Another Button)
- F: Amenity list
- Available Amenities available at the resource.
- Click to select!
Section 2: Meeting Spaces Options

- A: External Mailbox
- Optional for Outlook Room Calendars
- B: Contact Information
- Optional: But helpful if tickets come in
- C: Meeting Space Image
- Include a Screen Shot for your space!
- D: Floor Plan
- Include a Floor Plan for your space!
- E: Meeting Space Messages
- Alerts that Pop up before Booking a Space
- B: Additional Information
- Notes about the room for people to see
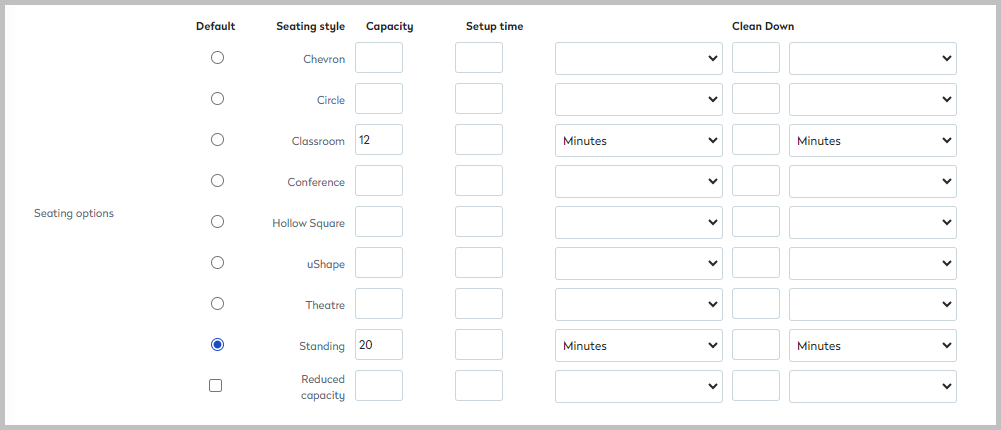
Section 3: Seating Options

Various seating options are available to select for meeting spaces. Enter the details for each seating style the room can be configured in and mark the standard style as Default. For each style, add the maximum capacity and set the Setup and Clean Down times (in minutes or hours) to block before and after bookings, to allow the space to be configured or cleared up.
Click Save or Save and add another when done.
Things to Know
Group Location and Floor may not show if you chose the options in the drop down menus. They may also not show if you use the Save or Save and add another when done creating the resource.
Floor Plan Requirements
- Images Requirements:
- File Type: JPEG / PNG
- Max Dimensions: 1920x1080
- Max File Size: 2 mb
- No Spaces or Special Characters
- Underscore Acceptable
- Dash Acceptable